|
Note
|
This document is under active development!
If you find errors or missing information in this document, please don’t hesitate to submit an issue or open a pull request with a fix. We encourage you to submit questions and discuss any aspects of the project on github. We are happy to welcome new contributors! |
Manage property on Testcase
Variabilizing data is essential for building robust and efficient automated test. It provide Flexibility, Reusability and Maintainability :
-
Dynamic Data: Imagine you have a test that checks that different user can login. Instead of hardcoding each steps, you can use variables and use the same step without rewriting the entire test script.
-
Multiple Scenarios: You can use variables to run the same test with different inputs, like different user names, passwords, or product IDs. This helps you cover a wider range of scenarios without creating separate tests for each variation.
-
Clearer Scenarios: Variables make your test scripts more readable. Instead of seeing hardcoded values scattered throughout, you have meaningful names like username , password , or product_id . This makes it easier to understand what the test is doing.
-
Easy Updates: If you need to change a value, you only need to update the variable definition, not every place it’s used in the test. This saves time and reduces the risk of errors.
1. Use static string (text)
You may have to use same step implementation with different data on different context (country for exemple). Or re-use the same step on other testcase (See how to add a Step in Library)
2. Generate static String
-
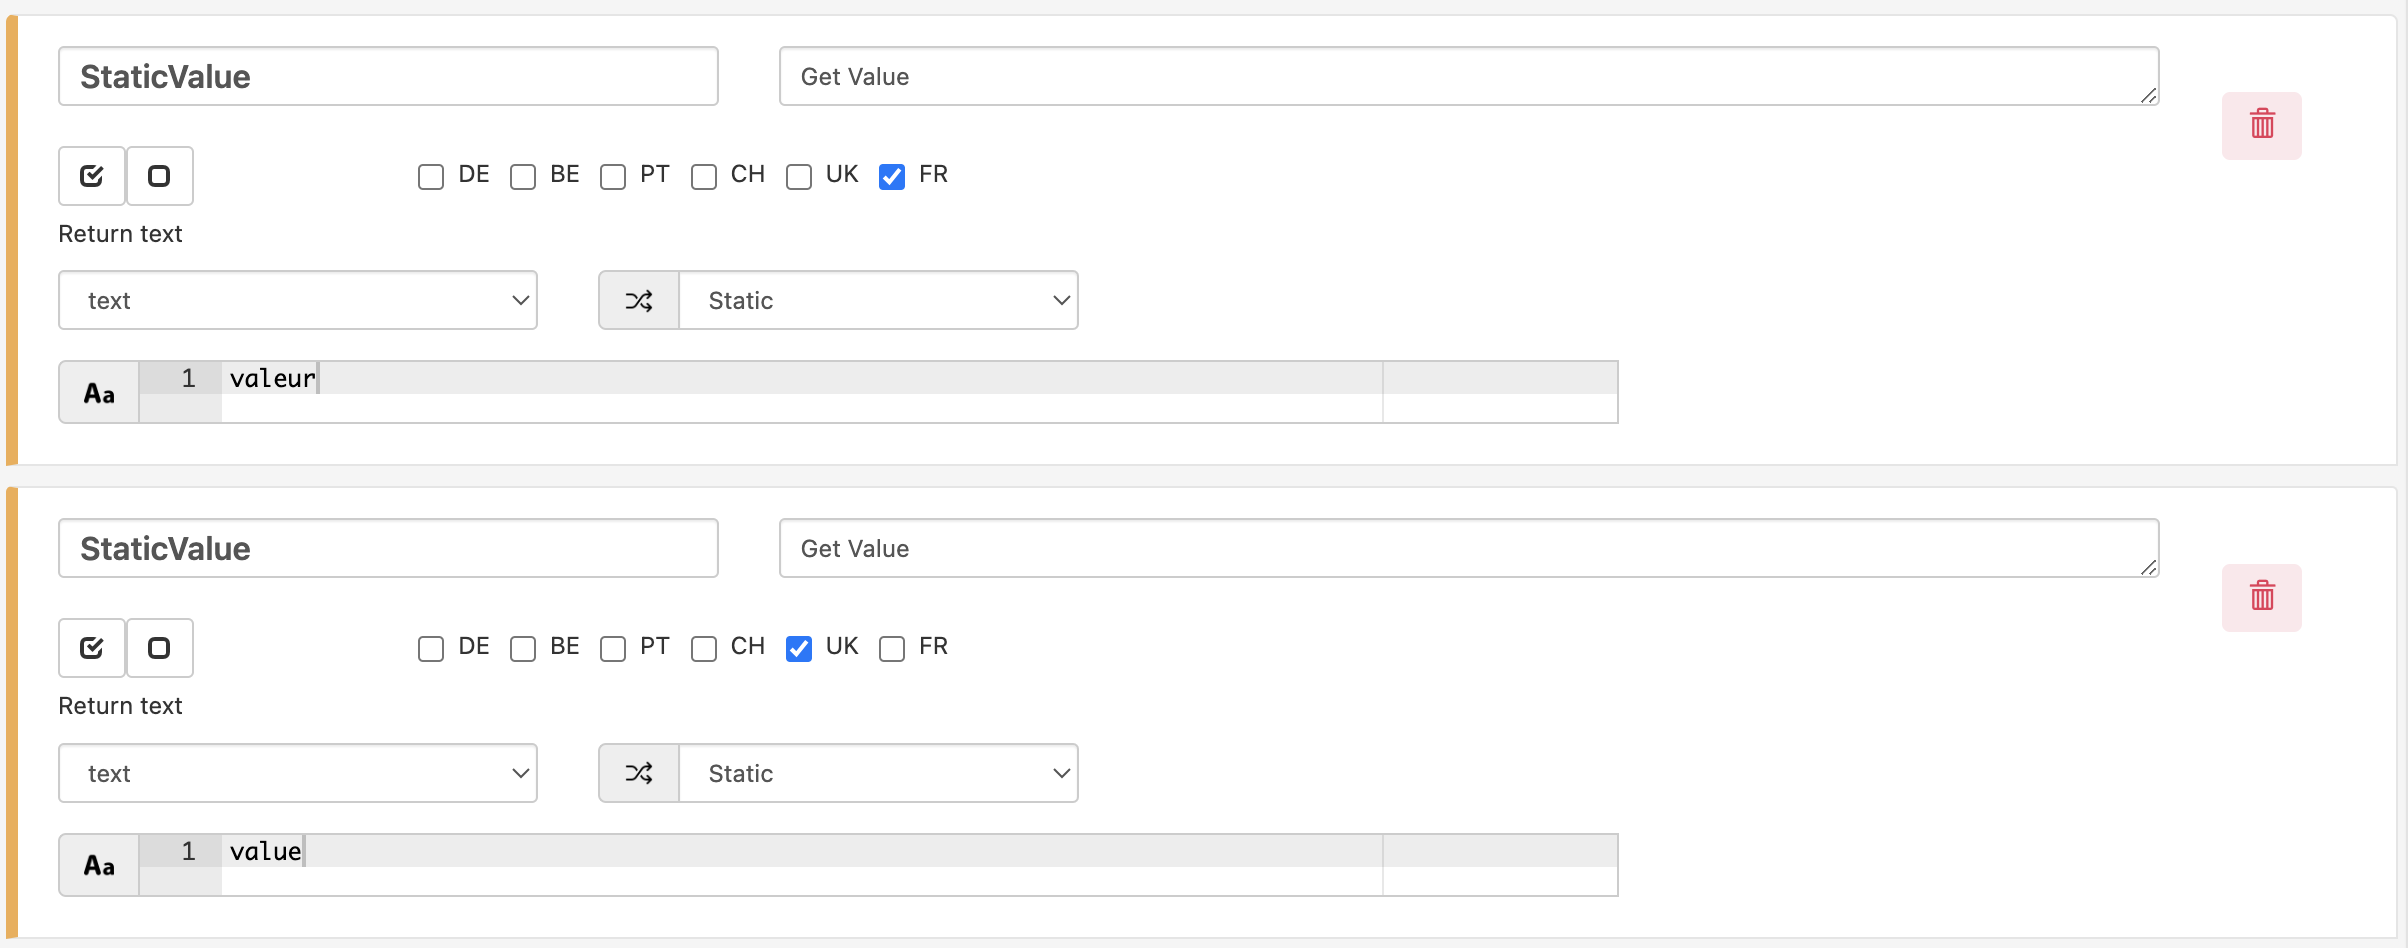
1 - Define a Static property
-
Type : Choose text option
-
Nature : Choose Static option
-
Value : Put the String you want to retreive
-
-
2 - Then, use in in the scenario

3. Generate random string with defined length (text)
In case you need to generate a random String
4. Generate random String with any alpha numeric characters
-
1 - Define a Random property
-
Type : Choose text option
-
Nature : Choose Random option
-
Length : Define the number of character you want to retrieve
-
Value : Keep empty
-

-
2 - Then, use in in the scenario

5. Generate random String with specific alpha numeric characters
-
1 - Define a Random property
-
Type : Choose text option
-
Nature : Choose Random option
-
Length : Define the number of character you want to retrieve
-
Value : Put the characters that will be used to generate random string (case sensitive)
-

-
2 - Then, use in in the scenario

6. Get information from Web Page (getFromHtml)
6.1. Get value from HTML Element
6.1.1. Get value from first HTML Element
This property type retrieves the value from the first HTML element that matches a specified selector. It takes an id, class, name, or any xpath as an argument, searches the DOM for the first matching element, and returns its value. If no element is found, it returns NA, could not find . This function is useful for quickly accessing form inputs or text content from the first occurrence of a specific HTML element in the document.
-
1 - Define a property
-
Type : Choose getFromHtml option
-
Element Type : Choose Value option
-
Nature : Choose Static option
-
Rank : Keep 0
-
Value : Put the xpath (or any identifier) to retrieve the element
-

-
2 - Then, use in in the scenario

6.1.2. Get value from specific HTML Element
This property type retrieves the value from a specific HTML element (defined in rank field) that matches a specified selector. It takes an id, class, name, or any xpath as an argument, searches the DOM for the first matching element, and returns its value. If no element is found, it returns NA, could not find . This function is useful for quickly accessing form inputs or text content from a specific HTML element in the document.
-
1 - Define a property
-
Type : Choose getFromHtml option
-
Element Type : Choose Value option
-
Nature : Choose Static option
-
Rank : Put an Integer, which is the element number that is retrieved
-
Value : Put the xpath (or any identifier) to retrieve the element
-

-
2 - Then, use in in the scenario

6.1.3. Get value from random HTML Element
This property type retrieves the value from a random HTML element (defined in rank field) that matches a specified selector. It takes an id, class, name, or any xpath as an argument, searches the DOM for the first matching element, and returns its value. If no element is found, it returns NA, could not find . This function is useful for quickly accessing form inputs or text content from a random HTML element matching criteria in the document.
-
1 - Define a property
-
Type : Choose getFromHtml option
-
Element Type : Choose Value option
-
Nature : Choose Random option
-
Value : Put the xpath (or any identifier) to retrieve the element
-

-
2 - Then, use in in the scenario

6.2. Get raw element from HTML
6.2.1. Get raw element from first HTML Element
This property type retrieves the raw HTML element from the first HTML element that matches a specified selector. It takes an id, class, name, or any xpath as an argument, searches the DOM for the first matching element, and returns the HTML code of the element as a string. If no element is found, it returns NA, could not find . This function is useful for inspecting the structure of an HTML element and extracting the HTML code for further processing.
-
1 - Define a property
-
Type : Choose getFromHtml option
-
Element Type : Choose Raw option
-
Nature : Choose Static option
-
Rank : Keep 0
-
Value : Put the xpath (or any identifier) to retrieve the element
-

-
2 - Then, use in in the scenario

6.2.2. Get raw element from specific HTML Element
This property type retrieves the raw HTML element from a specific HTML element (defined in rank field) that matches a specified selector. It takes an id, class, name, or any xpath as an argument, searches the DOM for the first matching element, and returns the HTML code of the element as a string. If no element is found, it returns NA, could not find . This function is useful for inspecting the structure of a specific HTML element and extracting the HTML code for further processing.
-
1 - Define a property
-
Type : Choose getFromHtml option
-
Element Type : Choose Raw option
-
Nature : Choose Static option
-
Rank : Put an Integer, which is the element number that is retrieved
-
Value : Put the xpath (or any identifier) to retrieve the element
-

-
2 - Then, use in in the scenario

6.2.3. Get raw element from random HTML Element
This property type retrieves the raw HTML element from a random HTML element (defined in rank field) that matches a specified selector. It takes an id, class, name, or any xpath as an argument, searches the DOM for the first matching element, and returns the HTML code of the element as a string. If no element is found, it returns NA, could not find . This function is useful for inspecting the structure of a random HTML element matching criteria and extracting the HTML code for further processing.
-
1 - Define a property
-
Type : Choose getFromHtml option
-
Element Type : Choose Raw option
-
Nature : Choose Random option
-
Value : Put the xpath (or any identifier) to retrieve the element
-

-
2 - Then, use in in the scenario

6.3. Get position of HTML element
6.3.1. Get position of first HTML Element
This property type retrieves the position (x,y) in pixel of the first HTML element that matches a specified selector, relative to the top left corner of the browser window. It takes an id, class, name, or any xpath as an argument, searches the DOM for the first matching element, and returns a tuple containing the x and y coordinates of the top-left corner of the element. If no element is found, it returns NA, could not find . This function is useful for determining the location of an element on the page and for interacting with it programmatically.
-
1 - Define a property
-
Type : Choose getFromHtml option
-
Element Type : Choose Coordinate option
-
Nature : Choose Static option
-
Rank : Keep 0
-
Value : Put the xpath (or any identifier) to retrieve the element
-

-
2 - Then, use in in the scenario

6.3.2. Get position of specific HTML Element
This property type retrieves the position (x,y) in pixel of a specific HTML element (defined in rank field) that matches a specified selector, relative to the top left corner of the browser window. It takes an id, class, name, or any xpath as an argument, searches the DOM for the first matching element, and returns a tuple containing the x and y coordinates of the top-left corner of the element. If no element is found, it returns NA, could not find . This function is useful for determining the location of a specific element on the page and for interacting with it programmatically.
-
1 - Define a property
-
Type : Choose getFromHtml option
-
Element Type : Choose Coordinate option
-
Nature : Choose Static option
-
Rank : Put an Integer, which is the element number that is retrieved
-
Value : Put the xpath (or any identifier) to retrieve the element
-

-
2 - Then, use in in the scenario

6.3.3. Get position of random HTML Element
This property type retrieves the position (x,y) in pixel of a random HTML element (defined in rank field) that matches a specified selector, relative to the top left corner of the browser window. It takes an id, class, name, or any xpath as an argument, searches the DOM for the first matching element, and returns a tuple containing the x and y coordinates of the top-left corner of the element. If no element is found, it returns NA, could not find . This function is useful for determining the location of a random element matching criteria on the page and for interacting with it programmatically.
-
1 - Define a property
-
Type : Choose getFromHtml option
-
Element Type : Choose Coordinate option
-
Nature : Choose Random option
-
Value : Put the xpath (or any identifier) to retrieve the element
-

2 - Then, use in in the scenario

6.4. Get attribute of HTML element
6.4.1. Get attribute of first HTML Element
This property type retrieves the value of a specific attribute from the first HTML element that matches a specified selector. It takes an id, class, name, or any xpath as an argument, searches the DOM for the first matching element, and returns the value of the specified attribute. If no element is found or the attribute is not found, it returns NA, could not find . This function is useful for accessing specific attributes of HTML elements, such as the 'href' attribute of a link or the 'src' attribute of an image.
-
1 - Define a property
-
Type : Choose getFromHtml option
-
Element Type : Choose Attribute option
-
Nature : Choose Static option
-
Rank : Keep 0
-
Attribute Name : Put the attibute name
-
Value : Put the xpath (or any identifier) to retrieve the element * Attribute : Put the attribute name to retrieve
-

-
2 - Then, use in in the scenario

6.4.2. Get attribute of specific HTML Element
This property type retrieves the value of a specific attribute from a specific HTML element (defined in rank field) that matches a specified selector. It takes an id, class, name, or any xpath as an argument, searches the DOM for the first matching element, and returns the value of the specified attribute. If no element is found or the attribute is not found, it returns NA, could not find . This function is useful for accessing specific attributes of a specific HTML element, such as the 'href' attribute of a link or the 'src' attribute of an image.
-
1 - Define a property
-
Type : Choose getFromHtml option
-
Element Type : Choose Attribute option
-
Nature : Choose Static option
-
Rank : Put an Integer, which is the element number that is retrieved
-
Attribute Name : Put the attibute name
-
Value : Put the xpath (or any identifier) to retrieve the element * Attribute : Put the attribute name to retrieve
-

-
2 - Then, use in in the scenario

6.4.3. Get attribute of random HTML Element
This property type retrieves the value of a specific attribute from a random HTML element that matches a specified selector. It takes an id, class, name, or any xpath as an argument, searches the DOM for the first matching element, and returns the value of the specified attribute. If no element is found or the attribute is not found, it returns NA, could not find . This function is useful for accessing specific attributes of a random HTML element matching criteria, such as the 'href' attribute of a link or the 'src' attribute of an image.
-
1 - Define a property
-
Type : Choose getFromHtml option
-
Element Type : Choose Attribute option
-
Nature : Choose Random option
-
Attribute Name : Put the attibute name
-
Value : Put the xpath (or any identifier) to retrieve the element * Attribute : Put the attribute name to retrieve
-

-
2 - Then, use in in the scenario

6.5. Get number of HTML element found
This property type retrieves the number of HTML elements found on the page that match a specified selector. It takes an id, class, name, or any xpath as an argument and returns the number of matching elements. If no element is found, it returns 0. This function is useful for determining the number of elements on the page that meet specific criteria, such as the number of links on a page or the number of images in a specific section.
-
1 - Define a property
-
Type : Choose getFromHtml option
-
Element Type : Choose Count option
-
Value : Put the xpath (or any identifier) to retrieve the element
-

-
2 - Then, use in in the scenario

6.6. Get table of value of all HTML element found
This property type retrieves the values of all HTML elements found on the page that match a specified selector and returns them as a table. It takes an id, class, name, or any xpath as an argument, searches the DOM for all matching elements, and returns a table where each row represents a found element and each column represents a specific attribute of that element. If no element is found, it returns an empty table. This function is useful for extracting data from a list of elements, such as the text content of all links on a page or the image URLs of all images in a gallery.
-
1 - Define a property
-
Type : Choose getFromHtml option
-
Element Type : Choose Value List option
-
Value : Put the xpath (or any identifier) to retrieve the element
-

-
2 - Then, use in in the scenario

6.7. Get all HTML element found in raw format
This property type retrieves all HTML elements found on the page that match a specified selector and returns them as a list of strings. It takes an id, class, name, or any xpath as an argument, searches the DOM for all matching elements, and returns a list containing the raw HTML code of each element. If no element is found, it returns an empty list. This function is useful for inspecting the structure of all matching elements and for extracting the HTML code for further processing.
-
1 - Define a property
-
Type : Choose getFromHtml option
-
Element Type : Choose Raw List option
-
Value : Put the xpath (or any identifier) to retrieve the element
-

-
2 - Then, use in in the scenario

Test Data
7. Connect to a SQL data source
-
Create a connection pool from config files located inside conf Tomcat folder. Both context.xml & server.xml need to be changed
context.xml
<ResourceLink name="jdbc/snowflake"
            global="jdbc/snowflake"
            type="javax.sql.DataSource"/>
server.xml
<Resource   name="jdbc/snowflake"
            global="jdbc/snowflake"
            auth="Container"
            type="javax.sql.DataSource"
            factory="org.apache.tomcat.jdbc.pool.DataSourceFactory"
            maxTotal="100"
            maxIdle="30"
            maxWaitMillis="10000"
            validationQuery="select 1"
            testOnBorrow="true"
            user="CERBERUSACCOUNT"
            username="CERBERUSACCOUNT"
            password="${db.password}"
            driverClassName="net.snowflake.client.jdbc.SnowflakeDriver"
            url="jdbc:snowflake://XXXX.eu-central-1.snowflakecomputing.com/?"/>
db.password parameter can be defined inside catalina.properties in order to support special characters inside password.
# Snowflake Password
db.password=XXXXXXXXXXXX
(Make sure not to remove the Cerberus database connectivity)
-
Copy the jdbc driver into lib Tomcat folder
-
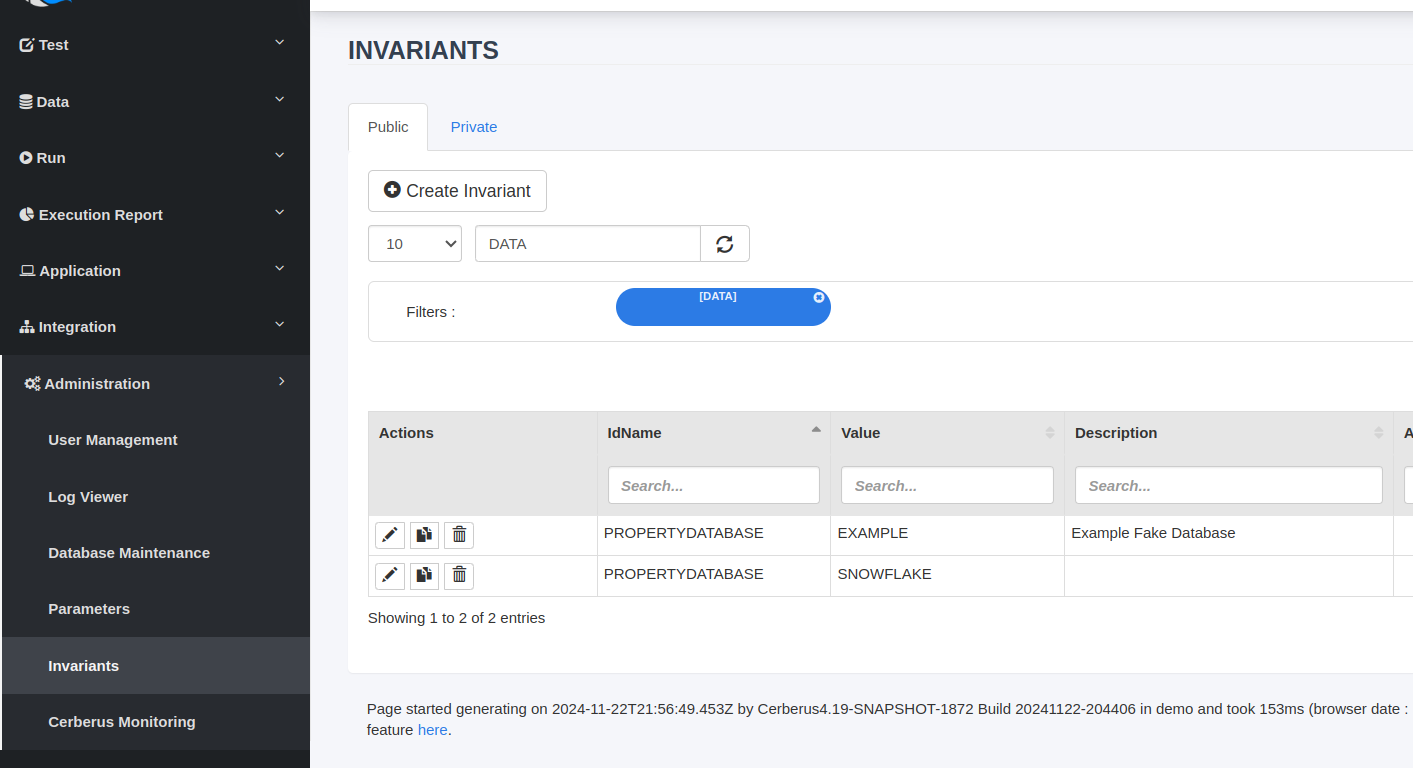
Inside Cerberus, create a “PROPERTYDATABASE” invariant, with a clear value.
-
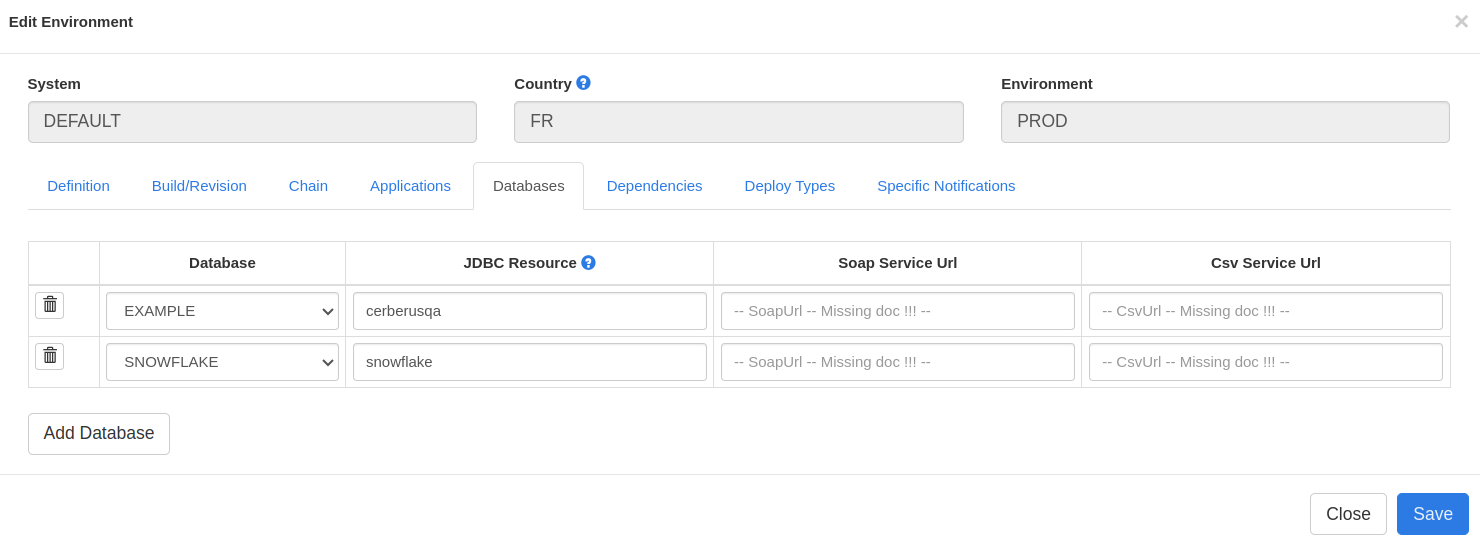
Inside Cerberus, at Environment level, you can link this database name with the right jdbc ressource depending on the correct environment
|
Note
|
Make sure that the name of the connection pool inside Tomcat starts by “jdbc/” Inside Cerberus “jdbc/” should not be added |
8. Connect to a CSV file data source shared from Gdrive
Create your file on GDrive either by uploading it from your local computer, either directly from GDrive by using : New >> More >> Text Editor.
Then, paste the data :
ID123,Olivier Durand
ID222,Benoit Dupont
ID999,Denis Smith
On the created file, select 'Share' then pick the option to get a link available for all people on the Internet.
The provided link should look like this :
following this format
Extract the YOUR_ID data and replace in the url :
That provide this result :
Create testdatalib.
Create a Testdatalib with type CSV and put in CSV URL the below URL :
Feed and map the subdata with column numbers. You can now use the testdatalib on your testcase properties.
|
Note
|
The file can be edited using Google Text Editor and new value will be used live on the following execution. |
CICD
9. Jenkins
An official JENKINS plugin is available. You can get further information from this repo
10. Github actions
You can integrate Cerberus easilly using documentation from this repo
11. Gitlab CICD
You can integrate Cerberus easilly using documentation from this repo
12. CICD campaign result
A campaign result is calculated at the end of the execution. The campaign is OK if the total score of all execution is bellow the defined threshold. It is KO in case the score is above.
The score is calculated giving the following formula :[source,]
nb of non OK execution of prio 1 testcases * parameter cerberus_ci_okcoefprio1
+
nb of non OK execution of prio 2 testcases * parameter cerberus_ci_okcoefprio2
+
nb of non OK execution of prio 3 testcases * parameter cerberus_ci_okcoefprio"
+
nb of non OK execution of prio 4 testcases * parameter cerberus_ci_okcoefprio4
+
nb of non OK execution of prio 5 testcases * parameter cerberus_ci_okcoefprio5
The threshold is defined at global Cerberus level using parameter cerberus_ci_threshold. Is default value is 100. This value can be overwride at campaign level allowing to tune it depending on the nb of testcases that campaign have.
Given a Campaign with a threshold of 100. If the parameters defined for prio1 = 100, prio2 = 50, prio3 = 20, prio4 = 10 and prio5 = 0
-
1 non OK execution of prio1 testcase will result a global KO result
-
2 non OK execution of prio2 testcase will result a global KO result
-
5 non OK execution of prio3 testcase will result a global KO result
-
10 non OK execution of prio4 testcase will result a global KO result
|
Note
|
Testcases can be temporary disabled from CICD result by moving its priority to 0. |
Notifications
13. email notifications
You can easily be notified by Email whenever the execution of your campaign starts and/or ends
-
Go to the menu
RunCampaignNotificationsEmail-
Set Y - Yes to Email Notify Start of execution if you want to receive an email everytime the execution of your campaign starts
-
Set Y - Yes to Email Notify End of execution if you want to receive an email everytime the execution of your campaign ends
-
Fill the Distribution List field with the email adresses that will receive the notifications set previously (example: test0@example.com; test1@example.com; test2@example.com)
-
N.B. : If the campaign is empty (no test execution set in the campaign), the email notification won’t be sent

14. Slack notifications
You can be notified on Slack channels whenever the execution of your campaign starts and/or ends
Pre-requisites
-
Slack account and workspace created (get one on https://slack.com)
-
Slack public channel created to receive the notifications (create one directly inside Slack)
-
Cerberus Testing Campaign created available in the menu
RunCampaign
1. Create a Slack application
-
Navigate to https://api.slack.com/apps on the Slack account that contains your channel
-
Define your "App Name" and select your "Workspace"
2. Activate Workspace Webhooks
-
Navigate in the bottom page to "Add features and functionality", and select "Incoming Webhooks"
-
Switch on the slider "Active Incoming Webhooks"
3. Retrieve the Webhook URL
-
Navigate in the botoom page to "Webhook URLS for Your Workspace" and click on "Add New Webhook to Workspace"
-
Keep the Webhook URL that has been created and verify it is set on the correct channel
4. Setting up the Campaign Parameters
-
Go to the menu
RunCampaignNotifications -
Select your *Event reference" for start or end
-
Select the "Hook Connector" to "Slack"
-
Set the Hook recipient with the webhook url and the Hook channel with your #channel
-
Test your notifications by running the campaign and verify the slack message appears if the condition are met
|
Tip
|
You can configure as many notifications using the event hooks combination |
Related resources
-
Articles
-
Tutorial video
15. Google Chat notifications
16. Microsoft Teams notifications
Issue Automated creation
In order to activate the feature, the following condition must be respected:
-
Parameter cerberus_autobugcreation_enable must be configured to true
-
The corresponding testcase must have a priority > 0
-
Corresponding testcase does not already have an existing Bug Open
-
Application Bug tracker connector needs to be different from NONE
Additional parameters needs to be defined depending on the connector that has been chosen.
17. JIRA issue creation
For JIRA connector, you needs to define at the application level on which projet the issue will be created using parameter Project Code
For ex : CER
You also need to define the type of issue that will be created using Ticket Type parameter. ex : Bug , Task
In order to plug Cerberus to JIRA the parameters : - cerberus_jiracloud_apiuser needs to be defined with a valid Jira email account. - cerberus_jiracloud_apiuser_apitoken needs to be defined with a valid Jira API Token that correspond to apiuser.
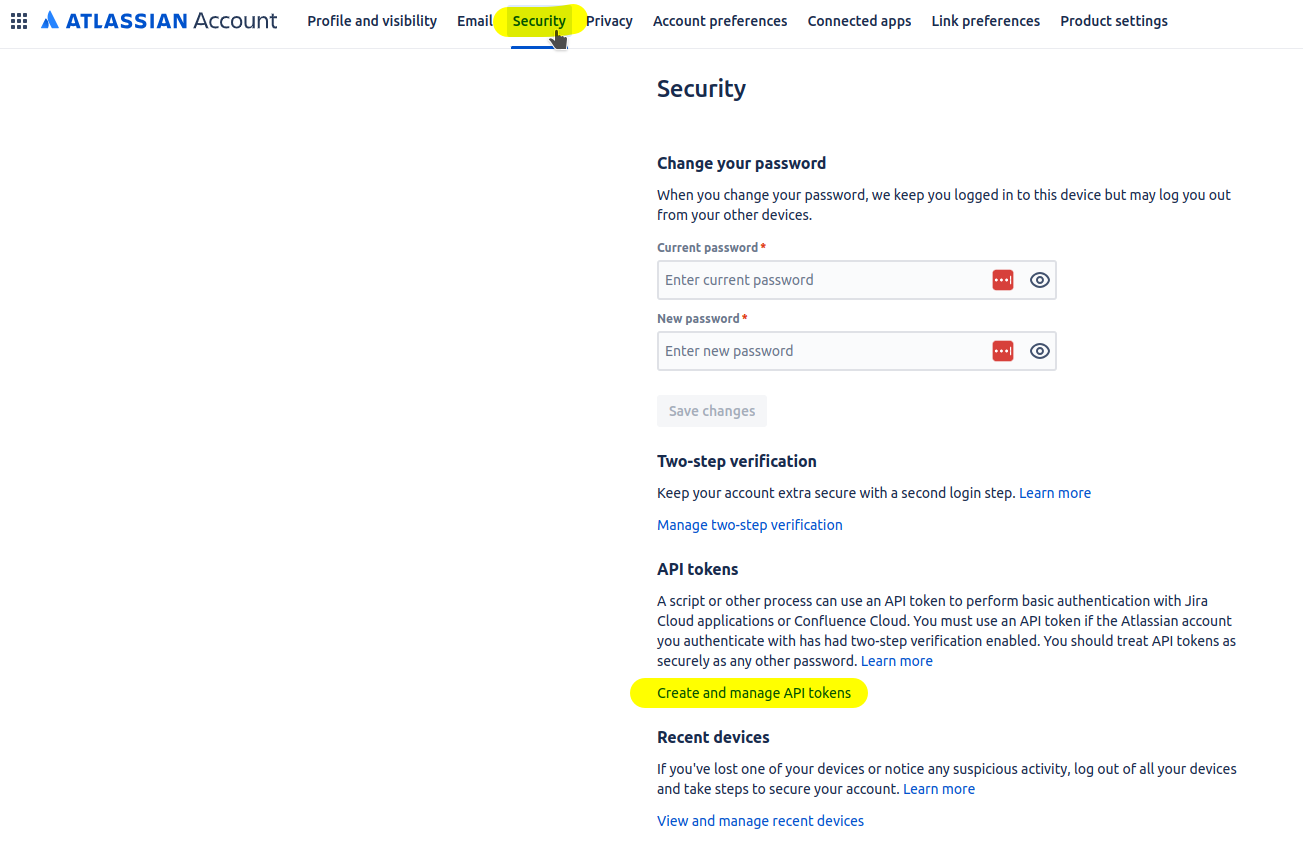
From your Jira account firt go to Security menu and click on Create and manage API tokens link
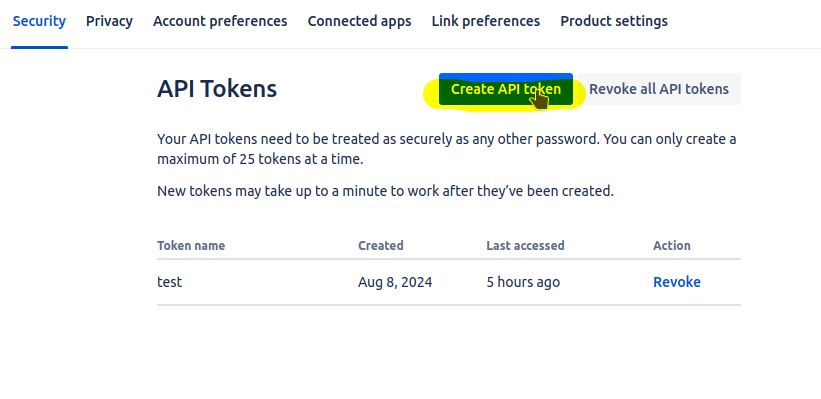
Then, select Create API Token
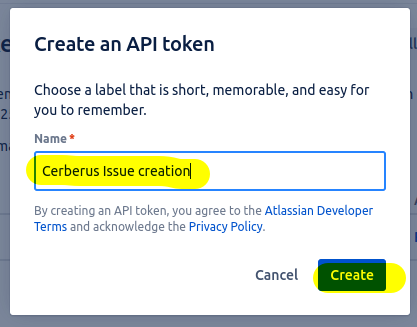
Then, choose a name and hit Create button
Then, Copy the token and click on Done button

The generated token needs to be paste to cerberus_jiracloud_apiuser_apitoken parameter.
18. Github issue creation
For Github connector, you needs to define at the application level on which projet the issue will be created using parameter organisation/repo
For example for repo https://github.com/cerberustesting/cerberus-sample-application organisation/repo should be :
cerberustesting/cerberus-sample-application
Optionaly you can define a label that will be added to issue created. ex : bug
In order to plug Cerberus to Github the parameter : cerberus_github_apitoken needs to be defined with a valid api token.
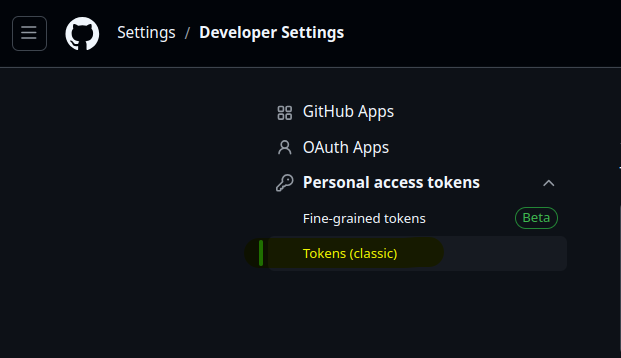
From your github account firt go to Developper settings menu
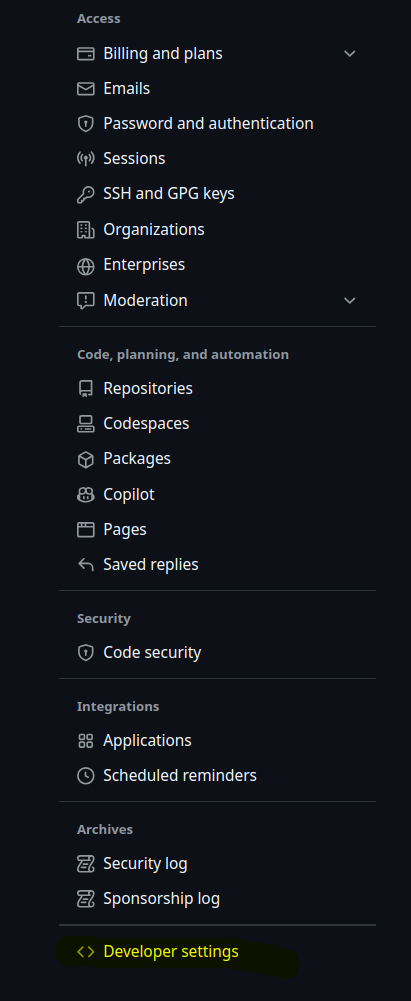
Then, select token
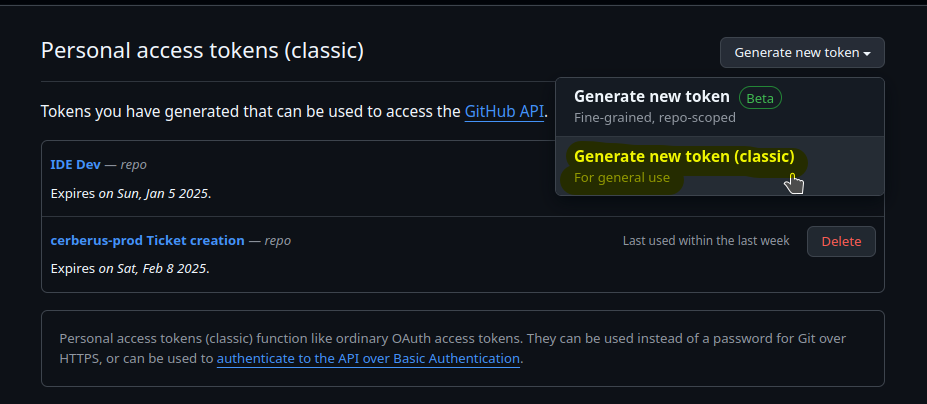
Then, Generate New Token
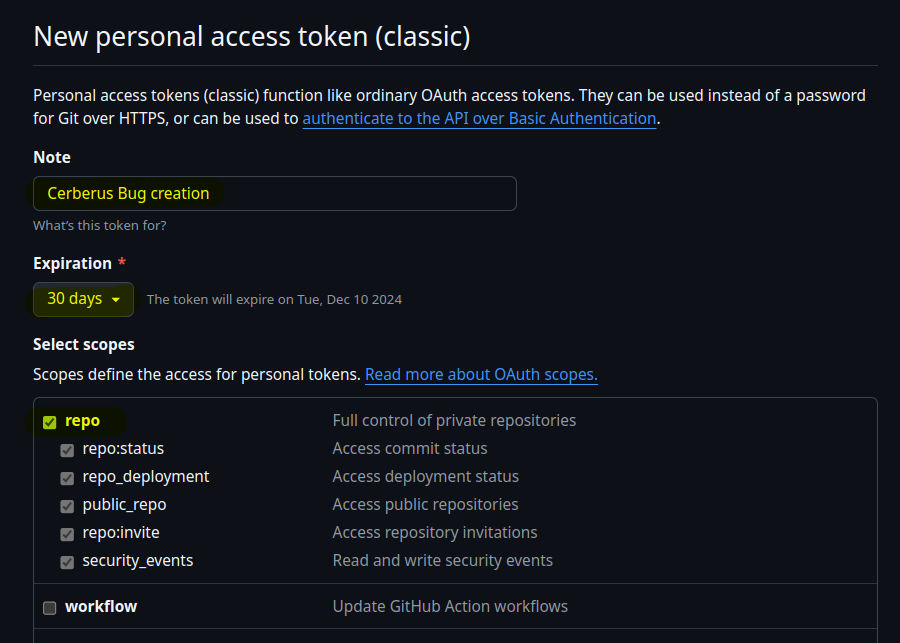
Then, Chosse a name, a duration and select the repo scopes
The generated token needs to be paste to cerberus_github_apitoken parameter.
External tools
19. JIRA Xray
JIRA Xray is a test management platform that integrate with JIRA platform. Cerberus integrate with Xray on both Cloud and DC versions.
Pre-requisites
-
A JIRA platform with Xray app installed.
-
A few Cerberus Tescases and at least a campaign
If you are using a JIRA Cloud platform, you will have to configure the authentification detailed on chapter 1. and then define the testcase links between Cerberus and Xray on chapter 3. If you are using a JIRA DC platform, you will have to configure the authentification detailed on chapter 2. and then also define the testcase links between Cerberus and Xray on chapter 3.
1. Configure Cerberus with JIRA Authentification (if using JIRA Cloud)
-
On JIRA side, go to JIRA Menu Apps >> Manage your Apps then select API Key from the left menu.
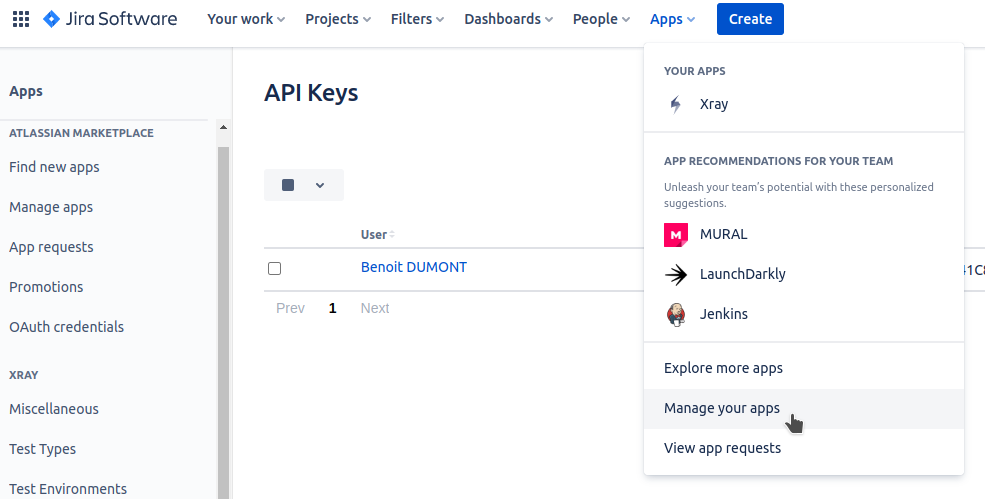
-
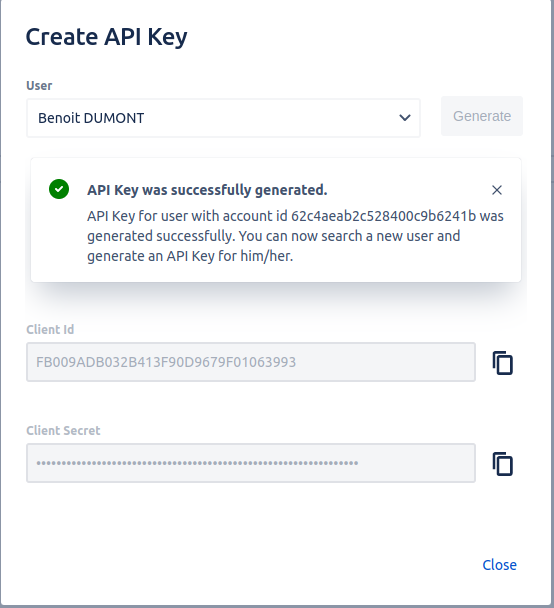
Click on Create API Key button in order to open a new modal screen that will ask you to select the user that will act as Cerberus. Click on Generate button. A client id and client secret is generated.
-
On Cerberus Side, set the 2 parameters cerberus_xraycloud_clientid and cerberus_xraycloud_clientsecret with the Client ID and Secret defined from JIRA Side.

2. Configure Cerberus with JIRA Authentification (if using JIRA DC)
-
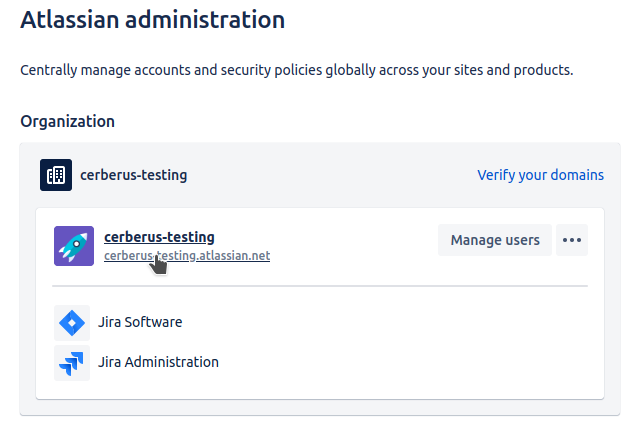
On JIRA side, go to JIRA Menu Administration.

-
Then select your organisation.
-
Then Go to Settings.

-
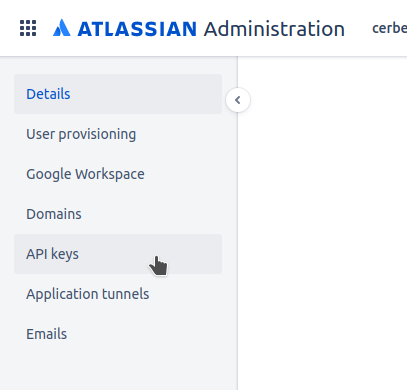
Then Go to API Keys.
-
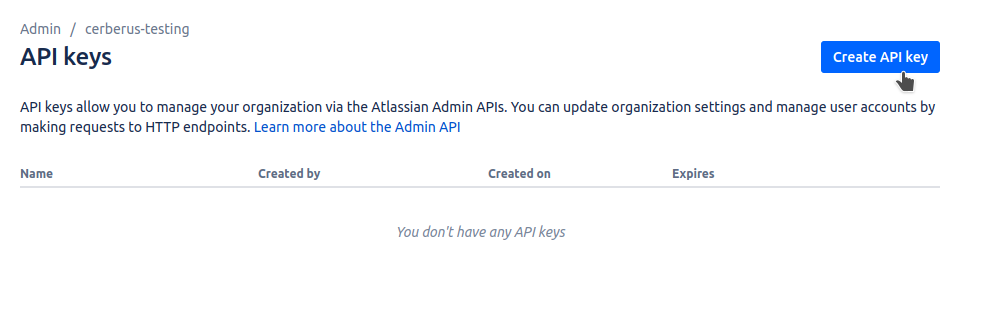
Then Click on Create API Key.
-
Choose a name and an expiration date for your key.
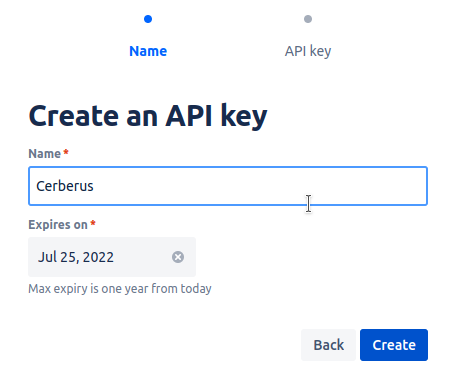
-
Then copy the created key.
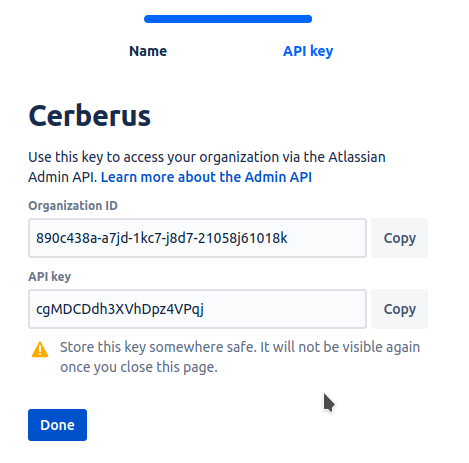
-
On Cerberus Side, set the 2 parameters cerberus_xraydc_token with the previously created API Key and cerberus_xraydc_url with the URL to your JIRA instance following the schema : http://yourserver.com (NB : /rest/raven/2.0/api will be added by Cerberus in order to access the API).

3. Link the Cerberus Testcases with JIRA Xray
-
Edit Testcase header of every of your testcase that you want to link with JIRA Xray in order to
-
feed External provider to JiraXray-Cloud if using a Cloud version of Xray or JiraXray-DC if you are using the DC version.
-
feed External Reference to the Epic reference (ex : CER-1)
-
-
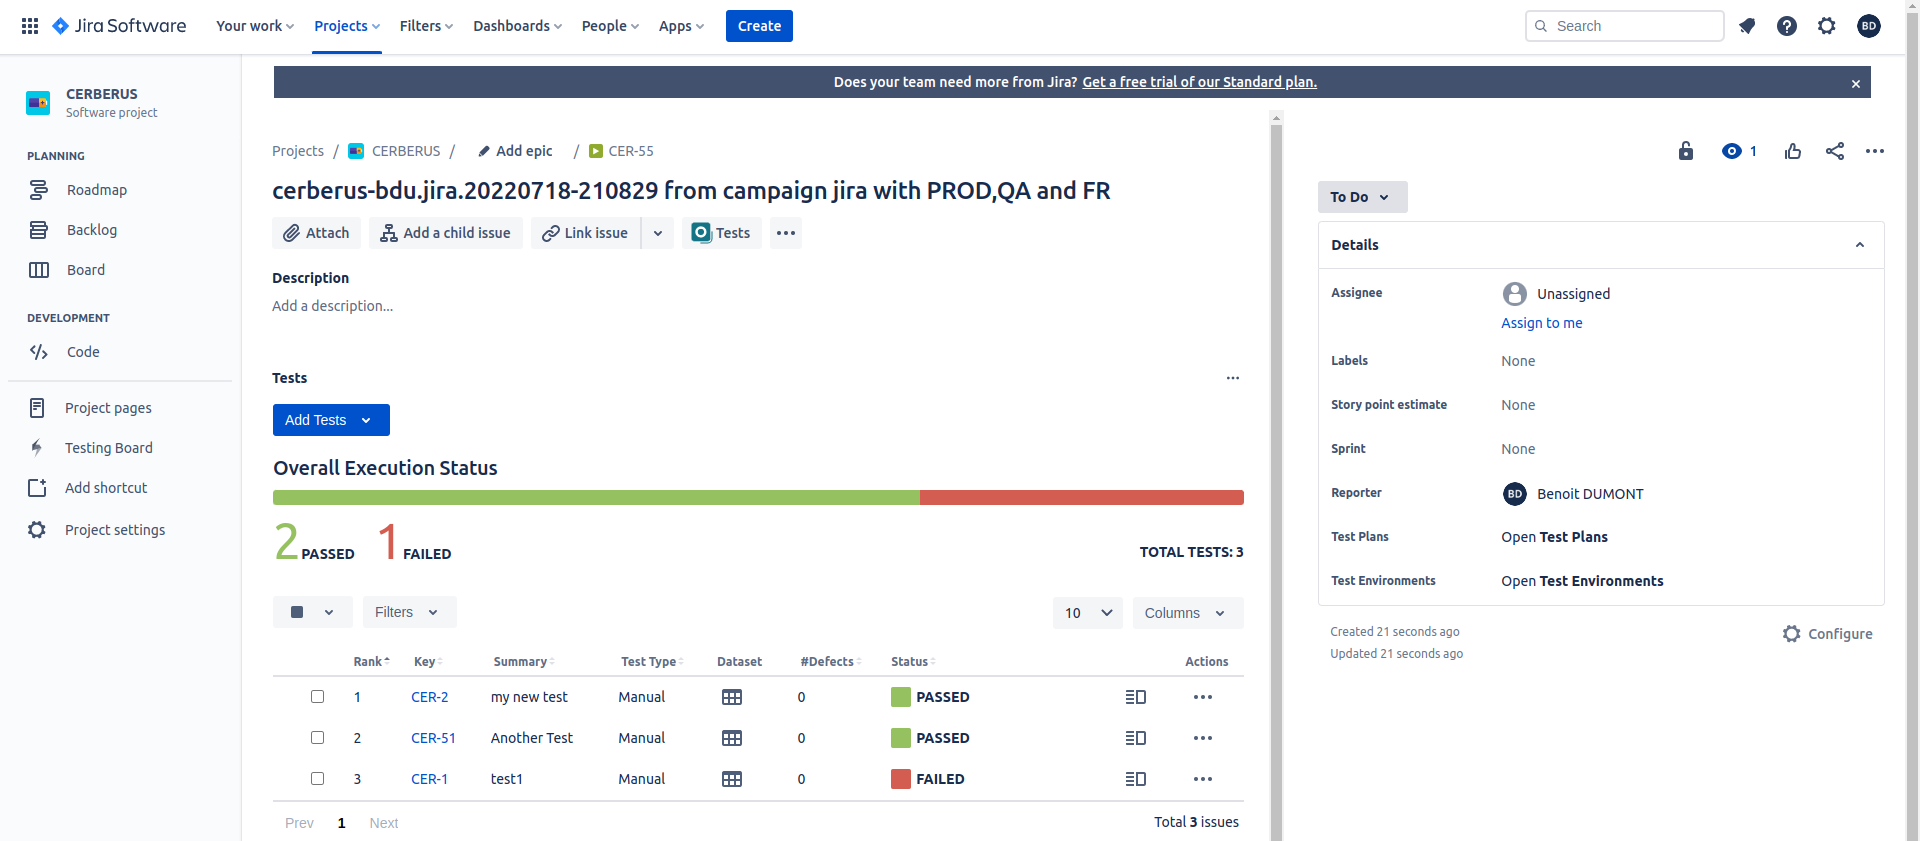
Execute your campaign that contain the executions. After a while you will see on the Tag Detail section the reference of the Test Execution Epic on JIRA side with a button that will bring you to the new Epic Xray screen.
At the end of every testcase execution, Cerberus will make API call to Xray in order to create the 'Test Execution' Epic if it doesn’t exist and add the Cerberus execution inside it as a test run.
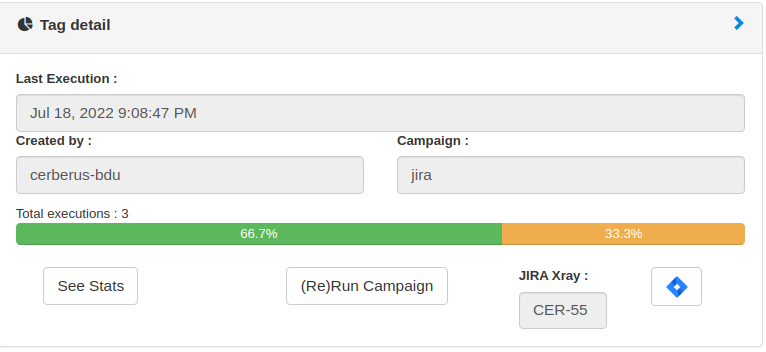
The button will bring you to the JIRA page :
|
Note
|
In case or error you can consult the Log viewer from Administration menu that will report the URL called and error received from the JIRA server. That error message also appear on Campaign execution screen as a tooltip on the ERROR field |
|
Note
|
Token Cache duration can be tuned thanks to parameter : cerberus_xray_tokencache_duration |
|
Note
|
Environments can be send to JIRA XRay if you activate parameter : cerberus_xray_sendenvironments_enable |
